


That stubborn SunPass sticker is practically mocking you from the corner of your windshield, isn’t it? It’s been a faithful companion on countless toll roads, but now it’s time for it to go, and it’s putting up a fight.
Whether you’re selling your car, getting a new transponder, or you’re just tired of looking at it, that little square of adhesive can be a real pain. The best way to remove a SunPass sticker is to gently heat it with a hairdryer, peel it off with a plastic scraper, and then use an adhesive remover like Goo Gone or WD-40 to eliminate any sticky residue left behind.
I’ve wrestled with these things more times than I care to admit, and I’m here to walk you through the process without you wanting to throw a rock at your own car.
First, Know Your Enemy: The SunPass Sticker
Before you start scraping, it helps to understand what you’re up against. Not all transponders are created equal, and the SunPass Mini is a special kind of stubborn.
The “Forever” Sticker (SunPass Mini)
The standard SunPass sticker is the “Mini.” According to the official SunPass website, once you remove this sticker, it’s designed to break and become unusable.
It’s basically the Mission: Impossible message of the tolling world; it will self-destruct after one use. This is by design, to prevent people from stealing them. But it also means the adhesive they use is ridiculously strong. You’re not just peeling off a piece of tape; you’re fighting a tiny, well-engineered security device.
Why Is This Adhesive So Clingy?
The adhesive on a SunPass Mini is built to survive the brutal Florida sun, torrential downpours, and years of temperature changes. It’s not your average craft glue; it’s a semi-permanent bond designed to last the life of your windshield.
Over time, that sun exposure bakes the sticker onto the glass, making the plastic brittle and the adhesive even harder. This is why an old sticker often flakes off in a million tiny, infuriating pieces instead of coming off cleanly. Fun, right?
Your Arsenal: Tools for the Great Sticker Peel-Off
You wouldn’t go into battle unarmed, so don’t attack your windshield without the right gear. You probably have most of this stuff lying around the house already.

The Essentials:
- A Hairdryer: Your number one weapon for loosening the adhesive’s death grip.
- Plastic Scraper: An old credit card, a plastic putty knife, or a dedicated plastic razor blade works perfectly.
- Microfiber Cloths: You’ll need a few for applying solutions and wiping everything clean.
The Residue Wreckers:
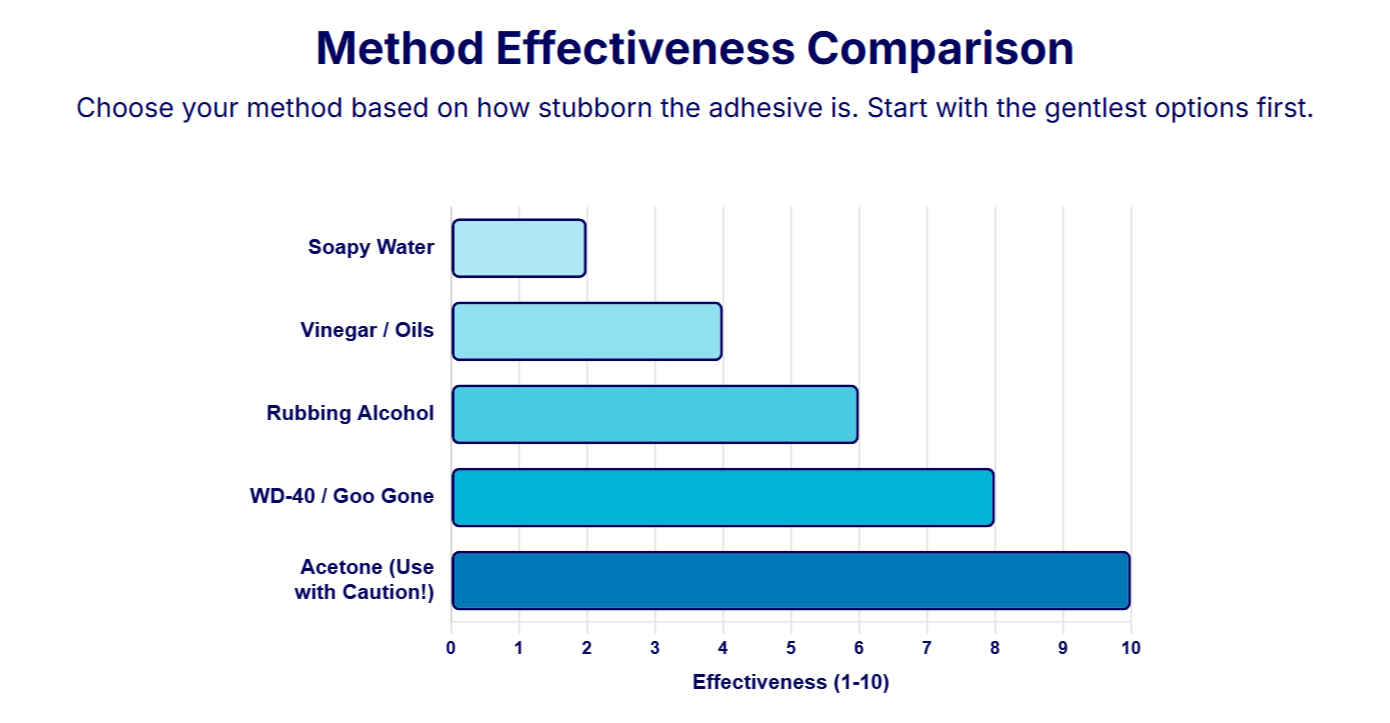
- Goo Gone or WD-40: These are the heavy hitters for dissolving that sticky mess left behind. IMO, WD-40 often works surprisingly well.
- Rubbing Alcohol: A great, less oily alternative for lighter residue.
The Finishing Touches:
- Glass Cleaner: To make your windshield look like nothing ever happened.
- Patience: Seriously, don’t skip this one. Rushing is how you make things worse.
The Main Event: Step-by-Step Removal Guide
Alright, it’s time to get to work. This whole process should only take about 15-20 minutes, depending on how baked-on your sticker is. Park your car in the shade if you can, as direct sunlight can make the glass too hot and evaporate your cleaners too quickly.

Step 1: A Little Heat Goes a Long Way
First, you need to soften that stubborn adhesive. Grab your hairdryer, set it to medium or high heat, and hold it a few inches from the sticker.
Heat the sticker for about 30 to 60 seconds, moving the hairdryer around to warm the entire surface evenly. You’re not trying to cook it, just make it warm to the touch. See how it’s starting to look a little less confident?
Step 2: The Gentle Scrape
While the sticker is still warm, take your plastic scraper or old credit card. Start at one of the corners and try to get the edge of the scraper underneath the sticker.
Push gently and work your way under the sticker with a slow, steady motion. If it starts to cool down and get tough again, just hit it with the hairdryer for another 20 seconds. The goal is to peel it off in one piece, but don’t be discouraged if it tears—that’s pretty common with older stickers.
Step 3: Banishing the Gummy Ghost
Once the sticker is off, you’ll almost certainly be left with a sticky, ghostly outline of its former self. This is where the real magic happens, tbh.
Apply Your Solution
Grab your chosen adhesive remover—Goo Gone, WD-40, or rubbing alcohol—and apply it to a microfiber cloth. Dab it onto the residue and let it sit for a few minutes to work its chemical wizardry. You should see the adhesive start to dissolve and soften.
Wipe Away the Mess
Now, using a clean part of the cloth, rub the area in small circles. The residue should start to lift off. You might need to apply a bit more solution and some elbow grease, but it will come off.
Hold Up! Read This Before You Cause Damage
I can’t stress this enough: there are a few things you should absolutely avoid doing unless you want to create a much bigger, more expensive problem.
Tools to Leave in the Garage
- Metal Razor Blades: Unless you are a professional and your glass is not tinted, leave these alone. One slip and you’ve got a permanent scratch.
- Steel Wool: It will absolutely scratch your glass into a hazy mess. Don’t do it.
- Abrasive Cleaners (like Comet): These will create thousands of micro-scratches and ruin the clarity of your windshield.
- Acetone (Nail Polish Remover): While it can dissolve adhesive, it can also instantly damage your car’s dashboard, plastic trim, and interior fabrics. The risk isn’t worth it.
The Tint Warning
If your windshield has any kind of aftermarket tint, you have to be extra careful. Do not let a metal razor blade anywhere near it. It will slice the tint film instantly.
I learned this the hard way on an old Honda Civic, and it was a sad, bubbly mess afterward. Just stick with plastic; it’s safer.
Future-Proofing Your Windshield
Want to make sure you never have to go through this ordeal again? There’s a brilliant little product for that.
The Sticker Shield Solution
Next time you get a new SunPass Mini, buy a Sticker Shield first. It’s a clear, non-adhesive film that sticks to the glass through static cling. You apply your SunPass to the Sticker Shield, and then apply the whole thing to your windshield.
When it’s time to remove it, the entire thing peels off cleanly with zero residue. It’s a simple, genius solution that makes the transponder removable and repositionable. You can find them on their official website and other online retailers.
So, You’ve Made a Mess… When to Call a Pro?
Look, sometimes things don’t go as planned. If you’ve tried everything and that residue just won’t budge, or if you accidentally scratched the glass, it might be time to tap out.
There’s no shame in calling a professional auto glass shop. They have specialized tools and solvents that can get the job done quickly and safely. It’s better to pay a small fee to have it done right than to cause permanent damage.
Your Questions, Answered (FAQ)
Here are a few quick answers to some common questions.
Can I reuse a SunPass Mini after removing it?
Nope. The SunPass Mini is designed to break upon removal to prevent theft. Once it’s off, it’s done for. You’ll need to get a new one.
What’s the difference between removing the Mini sticker and the portable SunPass PRO?
The SunPass PRO is a larger, portable unit that attaches with suction cups. It’s designed to be moved between cars and removes easily. This guide is specifically for the flat, sticker-style Mini transponder.
Will any of these methods damage my windshield’s defroster lines?
The methods described here are safe for defroster lines, as you’re primarily working with gentle heat, plastic tools, and mild solvents. Just avoid aggressive scraping directly over the lines.
The Victory Lap: Your Windshield is Finally Free!
And there you have it. The sticker is gone, the residue has vanished, and your windshield is crystal clear. The key was just a bit of heat, a gentle scrape, and a final cleanup.
Now you have a clean windshield and a story to tell. Go enjoy that beautiful, unobstructed view. You’ve earned it.

Pavithra Vinoth is the founder of nytollsinfo.com, where she simplifies U.S. toll systems through expert insights and custom-built calculators. Her research-driven tools help drivers avoid costly mistakes and make smarter car decisions.